How to Use the PNG Maker
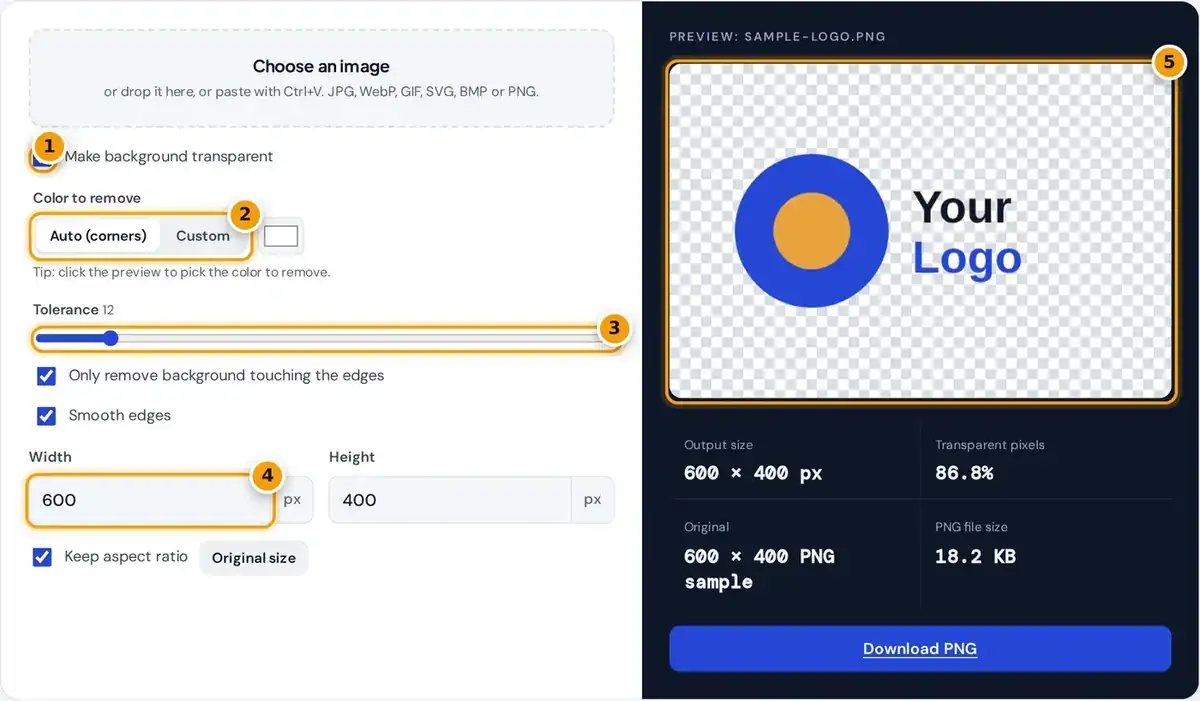
- Drop or choose an image, then tick Make background transparent.
- Let Auto read the corner color, or pick Custom and click the preview.
- Drag the tolerance slider until the background is fully cleared.
- Set a new width or height, with the aspect ratio kept.
- Check the preview, output size and file size, then press Download PNG.
Choose an image, use drag and drop onto the upload box, or paste a copied image with Ctrl+V, or Cmd+V on a Mac. JPG, WebP, GIF, BMP, SVG and PNG files all work here too.
Leave Make background transparent switched on to remove a white or solid background, and adjust the tolerance slider until the background disappears in the live preview while your subject stays fully intact and sharp throughout.
Change the width or height if you need a new size, then press Download PNG. For a plain JPG to PNG conversion, switch transparency off first, and the full image is saved as it looks.
How Background Removal Works
By default the PNG maker reads four corner pixels to find the background color. You can also pick a custom color, or click any spot in the preview to choose the exact shade to remove.
It then measures the color distance from that key color for every pixel, treating red, green and blue as three axes in RGB space. Pixels within the tolerance become fully transparent in the final image.
transparent if distance ≤ tolerance% × 441.7
(441.7 is the largest possible distance, from black to white)
With Only remove background touching the edges switched on, removal works like a flood fill from the border inward. Enclosed areas, such as the inside of a letter O or eye whites, are always kept.
Smooth Edges and Clean Cutouts
Hard cutoffs leave jagged edges, because every pixel is either fully kept or fully removed. Smooth edges fixes this by making pixels just outside the tolerance partly transparent, similar to anti-aliasing in most graphics software.
This matters most for a logo or text on a white background, where a thin white fringe would show when you place the transparent PNG on a dark web page, slide or product photo later.
The preview shows transparent areas as a gray checkerboard, so you can check edges before you download. Zoom in with your browser for a much closer look at curves and fine details of the subject.
Worked Example With a JPG Logo
In this worked example, a small JPG logo sits on a white background. Because of JPG compression artifacts, the white near the logo is really off-white, with color values of about 250, 250 and 250.
The distance from pure white is the square root of three times five squared, about 8.7, or roughly 2% of the maximum. The default tolerance of 12 removes everything up to a distance of 53.
So those off-white pixels become transparent, while a navy blue logo color such as 14, 22, 40 sits nearly 400 away and stays completely solid. That is why low tolerance values work well for logos.
PNG vs JPG vs WebP
PNG stands for Portable Network Graphics format. The W3C PNG specification defines it as a lossless image format with an optional alpha channel, so each pixel can be fully opaque, fully transparent, or partly transparent.
Lossless compression keeps sharp edges and text crisp, but it costs file size. A large photo saved as PNG can be several times bigger than a lossy JPG, and converting back never restores lost detail.
WebP supports transparency with smaller files, and SVG suits scalable vector logos. PNG remains the safest choice for icons and screenshots, and the Library of Congress format description covers its sustainability for long-term digital preservation.
| Format | Transparency | Compression | Best for |
|---|---|---|---|
| PNG | Yes, full alpha | Lossless | Logos, icons, screenshots, graphics with text |
| JPG | No | Lossy | Photos where small file size matters |
| WebP | Yes | Lossy or lossless | Websites that need small files |
| SVG | Yes | Vector | Logos and icons that must scale |
Resizing and Image Limits
The width and height boxes set the output size in pixels. With Keep aspect ratio on, changing one side updates the other automatically, and the Original size button restores the dimensions of your uploaded file.
Images can be up to 6,000 pixels on each side and 24 megapixels in total, depending on your device memory. SVG files without a set size are rendered at 1,024 pixels on the longest side.
Animated GIFs are converted using their first frame only. Enlarging a small image beyond its original size makes it bigger but not sharper, so start with the highest resolution version of the image you have.
Privacy, Uses and Tips
The conversion runs inside your browser using the HTML canvas, so there is no upload at all. That makes the tool safe for signatures, logos, ID photos and anything else you prefer to keep private.
Transparent PNG files work well for icons, screenshots, stickers, product photos, slide graphics and website headers. You can easily make a background transparent without Photoshop or an account, and downloads carry no watermark at all.
This tool suits flat, solid backgrounds. Images with shadows, gradients or busy scenes behind the subject need a dedicated AI cutout tool instead, and too high a tolerance eats into light parts of your subject.
- Start with a low tolerance and raise it slowly.
- Click a colored background in the preview to pick its exact color.
- Use a dedicated cutout tool for shadows, gradients or busy photo backgrounds.
- Set a larger width for SVG files you plan to print.
Frequently asked questions
How do I convert a JPG to PNG?
Choose your JPG file, switch off Make background transparent if you want to keep the background, then press Download PNG. The image is re-saved as a lossless PNG at the size you set.
How do I make the white background of an image transparent?
Keep Make background transparent on with the Auto color. Raise the tolerance until the white disappears in the checkerboard preview, turn on Smooth edges for clean outlines, then download the PNG.
Are my images uploaded to a server?
No. The image is decoded and converted by your browser on your own device, and nothing is sent to a server. You can even disconnect from the internet after the page loads.
Why is my PNG larger than the JPG?
PNG uses lossless compression, which stores every pixel exactly. Photos compress far better with lossy JPG, so the PNG version of a photo is usually several times bigger than the original file.
What is the largest image I can convert?
Up to 6,000 pixels on each side and 24 megapixels in total, depending on your device's memory. Very large images may take a few seconds longer to process on older phones.
Does converting to PNG improve image quality?
No. Converting to PNG keeps every pixel from that point on, but it cannot restore detail that JPG compression already removed. Start from the best quality original you have for the cleanest result.