How to Use the Low Quality Image Maker
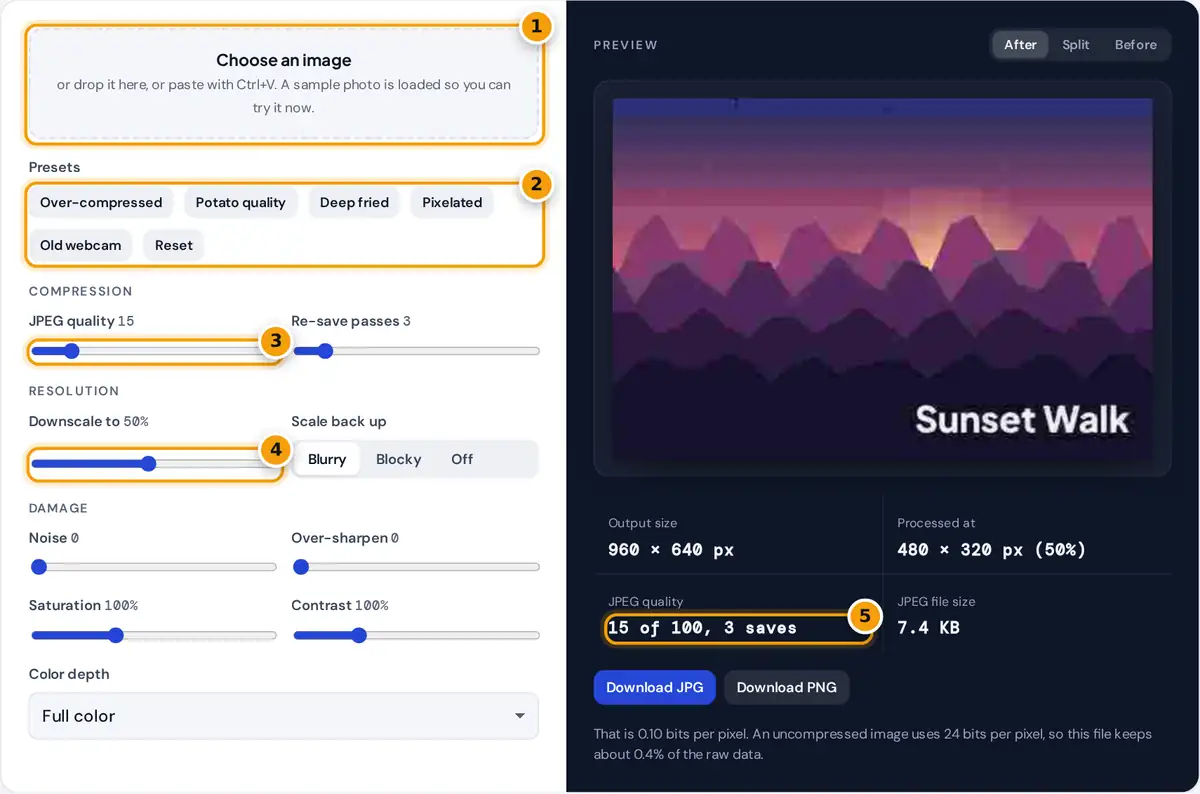
- Choose, drop or paste the image you want to ruin.
- Start from a preset such as Potato quality or Deep fried.
- Lower the JPEG quality and add re-save passes for heavier artifacts.
- Downscale to lose detail, then pick blurry or blocky upscaling.
- Check the result and file size, then download a JPG or PNG.
- Choose, drop or paste an image. A sample photo is already loaded so you can see the effect right away.
- Start from a preset: Over-compressed, Potato quality, Deep fried, Pixelated or Old webcam. Reset returns to a moderate starting point.
- Fine-tune the sliders. Lower JPEG quality makes bigger blocks and color smears, more re-save passes stack the damage, and downscaling throws away detail before the image is enlarged again.
- Use Split to compare the original and the result side by side.
- Download the result as a JPG, which keeps the real compression, or as a PNG, which freezes the damaged look without adding more.
Everything runs in your browser with its built-in JPEG encoder, so your pictures stay on your device.
Why JPEG Compression Looks Blocky
JPEG splits an image into 8 × 8 pixel blocks and stores each block as a mix of smooth patterns using the discrete cosine transform. The quality setting decides how coarsely those patterns are rounded off. At low quality most fine patterns round to zero, so each block turns flat and its edges become visible. Color is usually stored at lower resolution than brightness, which is why colors bleed and smear around sharp edges, the familiar "crunchy" look. The format is defined in the ITU-T T.81 standard published by the W3C archive.
Saving a JPEG again does not restore anything. Each pass rounds the already damaged image once more, which is called generation loss. This tool alternates the quality by two steps between passes so the rounding keeps changing and the artifacts keep building, the way a meme degrades after being screenshotted and reposted many times.
How Downscaling and Bits per Pixel Work
bits per pixel = file size in bytes × 8 ÷ (width × height)
Worked example: the sample photo is 960 × 640 pixels. At a downscale of 50% the tool works on a 480 × 320 image, only a quarter of the original 614,400 pixels. It then enlarges the result back to 960 × 640, either blurry (smooth interpolation) or blocky (each pixel becomes a 2 × 2 square). An uncompressed image needs 24 bits per pixel (8 each for red, green and blue). If the final JPEG is 30 KB, that is 30 × 1024 × 8 ÷ 614,400 = 0.4 bits per pixel, or about 1.7% of the raw data. The note under the preview shows this figure for your image.
What Each Setting Does
| Setting | Effect | Typical meme value |
|---|---|---|
| JPEG quality | Block artifacts and color smearing | 3 to 15 |
| Re-save passes | Generation loss, stacked artifacts | 4 to 10 |
| Downscale | Loss of detail, blur or pixel blocks | 15% to 40% |
| Noise | Grain like a cheap phone sensor | 15 to 35 |
| Over-sharpen | Harsh halos around edges | 60 to 90 for deep fried |
| Saturation and contrast | Burned, oversaturated colors | 200% to 300%, 150% to 200% |
| Color depth | Banding and posterized gradients | 4 to 16 levels |
Uses for a Low Quality Image
- Memes and reaction images where the crunchy look is part of the joke.
- Testing how a website, app or image recognition model handles badly compressed uploads.
- Design textures for retro, glitch, lo-fi or vaporwave artwork.
- Teaching how lossy compression works, by comparing quality levels with the split view.
Limits and Notes
Large photos are reduced to 1,600 pixels on the longest side before processing to keep the page fast. Results can differ slightly between browsers because each one ships its own JPEG encoder. The noise uses a fixed seed, so the same settings give the same result each time. Transparent areas of a PNG become white, since JPEG has no transparency.
Frequently asked questions
How do I make a picture low quality?
Load the image and lower the JPEG quality, add a few re-save passes and downscale it. The Potato quality preset does all of this at once, then you can download the result as a JPG or PNG.
How do I make a deep fried meme?
Press the Deep fried preset. It combines very low JPEG quality, eight re-saves, heavy sharpening, extra noise, about triple saturation and high contrast, which together create the burned, crunchy meme look.
Why does saving a JPEG again make it worse?
JPEG is lossy. Every save rounds the image data again, and detail lost in one save never comes back. Repeated saves stack these losses, which is called generation loss.
What JPEG quality counts as low?
Around 75 to 90 looks clean for photos. Below about 30 blocks and color smears become visible, and values under 10 produce the heavy artifacts used in memes.
Should I download a JPG or a PNG?
Download a JPG when you want the real compressed file. Choose PNG when you will edit or repost the image, because PNG keeps the damaged look exactly without adding another round of compression.
Are my images uploaded?
No. The image is compressed and edited by your own browser, and the download is created on your device. Nothing is sent to a server.